开发一个查询天气信息的MCP服务器

我们在 一文了解MCP协议 这篇博客中已经介绍了 MCP 协议的一些基本知识,以及简单配置了一个基于 sqlite 的 MCP 服务器的使用。
这篇文章,我们来开发一个基于天气查询的 MCP 服务器,并配置到大模型中,来看一下 MCP 服务器的开发相关的知识。

创建项目

环境配置

这里我们使用 NodeJs 来编写 MCP 服务器,所以需要本地电脑安装 NodeJs 环境,安装完成后,确认以下命令能够正确输出版本号:

1
2
node --version
npm --version

确认环境无误后,我们就可以创建项目了:

1
2
3
4
5
6
7
8
9
10
mkdir cmp-weather
cd mcp-weather

npm init -y

npm install @modelcontextprotocol/sdk zod
npm install -D @types/node typescript

mkdir src
touch src/index.ts

通过以上命令,我们已经成功创建了一个 MCP 项目,并安装了依赖包。

修改配置文件

修改 package.json 文件,添加 type:"module"以及 build命令,如下所示:

1
2
3
4
5
6
7
8
9
10
{
"type": "module",
"bin": {
"weather": "./build/index.js"
},
"scripts": {
"build": "tsc && node -e \"require('fs').chmodSync('build/index.js', '755')\""
},
"files": ["build"]
}

创建 tsconfig.json 文件,如下所示:

1
2
3
4
5
6
7
8
9
10
11
12
13
14
15
{
"compilerOptions": {
"target": "ES2022",
"module": "Node16",
"moduleResolution": "Node16",
"outDir": "./build",
"rootDir": "./src",
"strict": true,
"esModuleInterop": true,
"skipLibCheck": true,
"forceConsistentCasingInFileNames": true
},
"include": ["src/**/*"],
"exclude": ["node_modules"]
}

代码实现

接下来,我们需要实现 src/index.ts 文件中的代码。
这里我们对接一个第三方的天气服务查询接口来进行天气信息的查询。

1
2
3
4
5
6
7
8
9
10
11
12
13
14
15
16
17
18
19
20
21
22
23
24
25
26
27
28
29
30
31
32
33
34
35
36
37
38
39
40
41
42
43
44
45
46
47
48
49
50
51
52
53
54
55
56
57
58
59
60
61
62
63
64
65
66
67
68
69
70
71
72
73
74
75
76
77
78
79
80
81
82
83
84
85
86
87
88
89
90
91
92
93
94
95
96
97
98
99
100
101
102
103
104
105
106
107
108
109
110
111
import { McpServer } from "@modelcontextprotocol/sdk/server/mcp.js";
import { StdioServerTransport } from "@modelcontextprotocol/sdk/server/stdio.js";
import { z } from "zod";

const BASE_URL = "http://apis.juhe.cn";
const USER_AGENT = "weather-app/1.0";
const API_KEY = "******";

// 实例化一个MCP服务器
const server = new McpServer({
name: "weather",
version: "1.0.0",
});

/**
* 获取天气信息
* @param city 城市名称
*/
async function getWeather(city: string) {
const url = `${BASE_URL}/simpleWeather/query`;

const headers = {
"User-Agent": USER_AGENT,
Accept: "application/json",
};

try {
// 使用form-data发送数据
const formData = new FormData();
formData.append("city", city);
formData.append("key", API_KEY);

const response = await fetch(url, {
method: "POST",
headers,
body: formData,
});

if (!response.ok) {
throw new Error(`HTTP error! status: ${response.status}`);
}

const data = await response.json();

return data;
} catch (error) {
console.error("Error fetching weather data:", error);
throw error;
}
}

// 定义MCP工具
// 名称为 getWeather
// 描述为 获取某个城市的天气信息
// 参数为 city,这里MCP使用了 zod 来定义参数类型
// 第四个参数为回调函数,用于处理具体的逻辑
server.tool(
"getWeather",
"获取某个城市的天气信息",
{
city: z.string().describe("城市名称"),
},
async ({ city }) => {
const res = await getWeather(city);

if (res.error_code !== 0) {
return {
content: [
{
type: "text",
text: "获取天气信息失败",
},
],
};
}

const { realtime, future } = res.result;
let txt = city + "的天气信息:\n";
txt += `实时天气:${realtime.info}${realtime.temperature}°C,${widMap.get(realtime.wid)}${
realtime.direct
}${realtime.humidity}%湿度,${realtime.aqi}空气质量\n`;
txt += `未来天气:\n`;
for (const weather of future) {
txt += `${weather.date}${weather.weather}${weather.temperature}°C,白天:${widMap.get(
weather.wid.day
)};夜间:${widMap.get(weather.wid.night)}${weather.direct}\n`;
}

// 返回结果,content是是个数组
return {
content: [
{
type: "text",
text: txt,
},
],
};
}
);

async function main() {
// 本地服务,这里使用 stdio 传输
const transport = new StdioServerTransport();
await server.connect(transport);
console.error("Weather MCP Server running on stdio");
}

main().catch((error) => {
console.error("Fatal error in main():", error);
process.exit(1);
});

上面代码基本上是一个完整的天气查询的 MCP 服务器,我隐藏了部分类型定义的无关代码。
其中 getWeather 函数是获取天气信息的函数。
然后通过server.tool()命令来注册这个工具到 MCP 服务器。
最后通过 main 函数来启动服务。

MCP 服务调试工具

MCP 服务调试工具是大模型提供的一个可视化界面,用于帮助用户测试和调试 MCP 服务。

使用如下命令安装调试工具:

1
npm install -D @modelcontextprotocol/inspector

然后在 package.json 中添加调试脚本:

1
2
3
4
"scripts": {
...
"inspect": "mcp-inspector node build/index.js"
},

然后在命令行中运行 npm run inspect 即可打开调试界面:
202503101531634

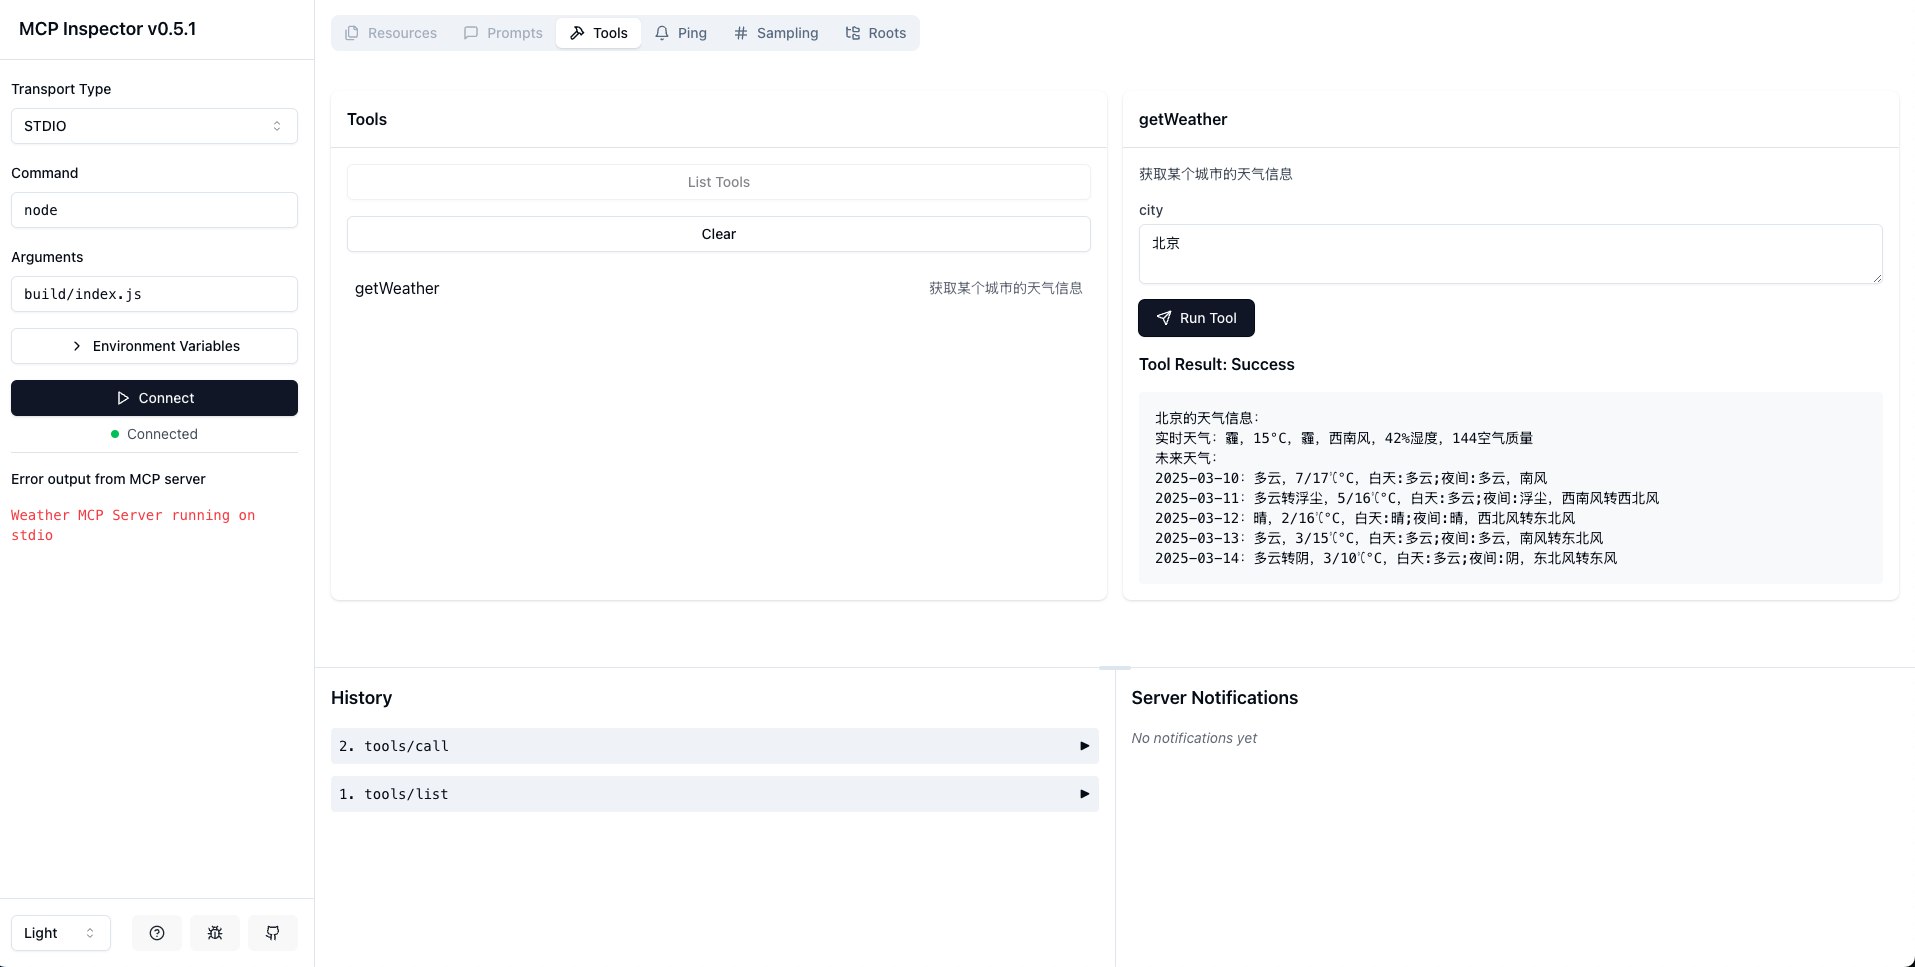
这样我们就可以从调试界面中调用定义的 MCP 服务,并且可以查看其返回的结果了。

服务配置及使用

使用 npm run build 命令来编译代码,生成到 build/index.js

然后将其配置到支持 MCP 协议的客户端中,大致如下:

1
2
3
4
5
6
{
"key": "weather",
"description": "查询天气",
"command": "node",
"args": ["/your-path/mcp-weather/build/index.js"]
}

这里我是用一个叫 5ire 的客户端来测试的,这个客户端可以支持 OpenAI,DeepSeek,Grok 等在线大模型的配置,也支持 Ollama 本地大模型服务,而且其实现了 MCP 协议,可以对接 MCP 服务器,推荐一下。

我们上述配置代码配置到客户端后,就可以在客户端测试使用了。

这里我使用的 ollama 本地大模型服务,模型用的 qwen2.5:7b

202503101028799

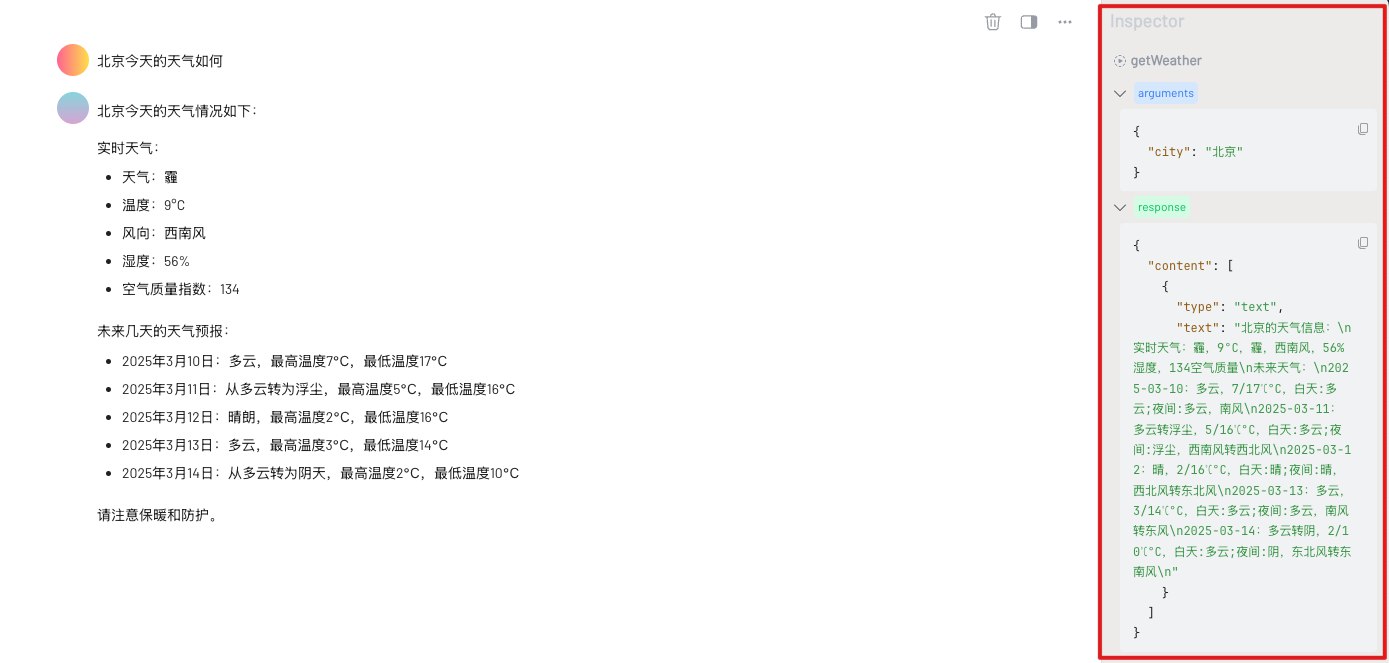
我们直接问大模型北京天气如何,它会正确识别的需要查询天气,然后会自动调用已经配置好的 getWeather 这个 MCP 服务。

上午中左侧部分为对话框的具体对话内容,右侧部分,是调用 MCP 服务器的过程,我们可以看到,它会以北京为参数,调用了 getWeather 服务,然后 getWeather 返回北京的天气信息,大模型再将这个返回的天气信息处理好格式,最终显示在对话框中。

结语

通过以上案例我们可以看到,我们只是定义了 MCP 服务的名称和描述,大模型会根据定义的名称和描述,自动的理解用户需求并调用相关的服务,而不用人为的去指定服务名。
即使一个 MCP 服务器定义了多个工具,工具之间会有关联,大模型也会自动根据描述,以及工具之间的返回结果,逐一调用相关工具来实现最终的需求。
而且在实现时,我们可以发现,其实现还是挺简单的,基本上一个 MCP 服务,通过一个 index 文件即可完成。

现在网上已经非常多的开源 MCP 服务器了,对于我们的日常开发来说,完全可以不用再自己实现一遍,直接用现有的服务即可,大大简化了日常的开发量。

https://github.com/punkpeye/awesome-mcp-servers