使用travis自动构建部署Hexo博客至github pages

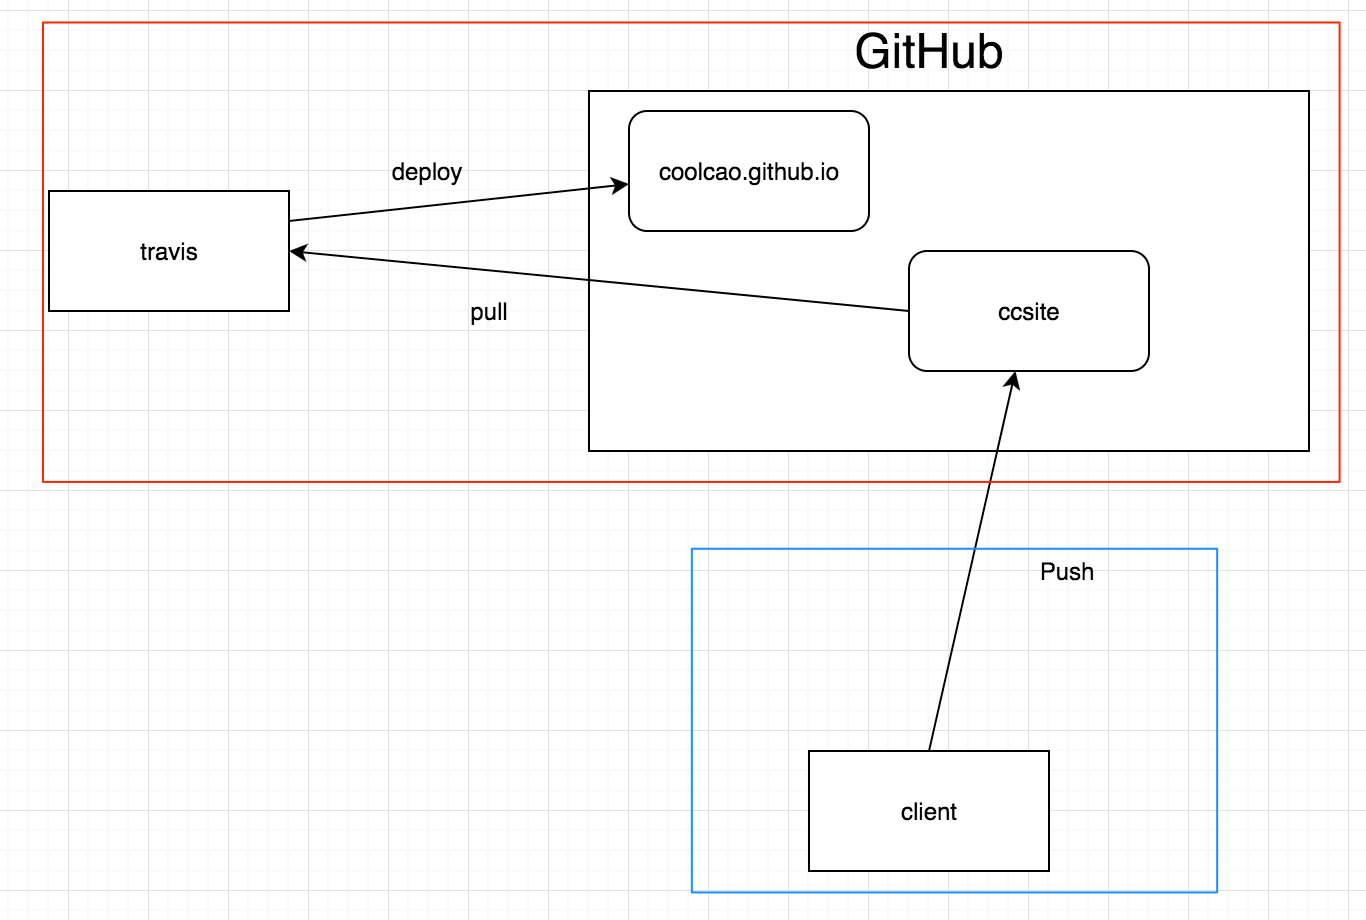
使用hexo搭建博客,然后将生成的静态网页托管到github pages上,需要三个步骤:

  • 编写markdown博客
  • hexo生成并发布
  • 将markdown源码推送到github备份

这个步骤还是有点繁琐,因为,使用需要手动生成静态网页,手动推送markdown源码。
那么,能不能将两个步骤合在一起呢?
当然可以,使用Travis自动化构建。

什么是travis

travis是一款在线的开源项目集成构建工具,与github无缝连接。支持多种语言。
我们可以将流程改为这样:

  • 编写并提交markdown到github
  • travis自动构建并发布到github pages
    这样我们只需要编写markdown并提交就可以了,剩下的事情交由travis去自动构建发布。

travis

前提说明

具体怎么搭建hexo,开通github pages这里不再做具体说明,网上资源很多,可google。
这里,我有两个项目:

  • ccsite:hexo博客源码项目,markdown源码都在这里。也是主要对这个项目进行动手。
  • coolcao.github.io:这个是我的github pages项目,即生成的静态网页部署到这个项目。

要想travis克隆github代码,有两种授权方式:access token和证书。
我的博客托管在github和coding上了,但是coding不支持access token方式,只有GitHub支持,因此,这里我使用证书的方式。

生成证书

1
ssh-keygen -t rsa -C "me@coolcao.com"

这里我生成的是 ~/.ssh/id_rsa_travis,passphrase留空即可。
生成完毕,~/.ssh/目录下会有两个文件:id_rsa_travisid_rsa_travis.pub

配置github公钥

到github的配置中心,添加公钥,将id_rsa_travis.pub中的内容添加进去。

配置travis

网页登录travis,直接用github登录即可。
登录完成后,会完整列出你的github上所有公开项目。
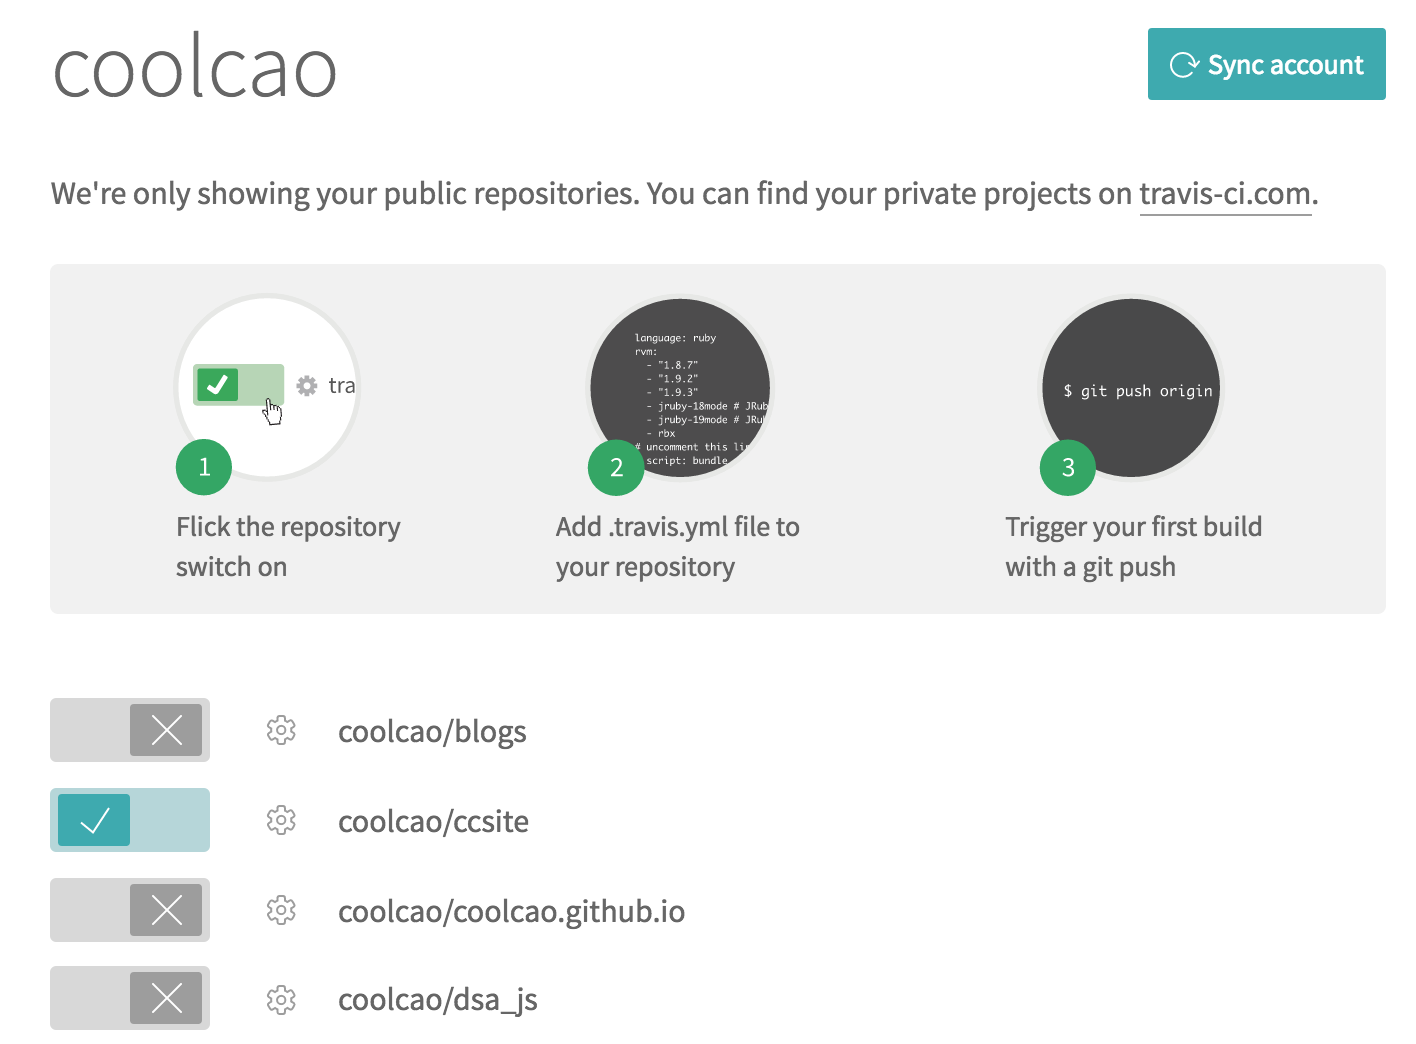
所有项目

选择你的hexo项目,开启。
然后点击配置,配置如下:

配置

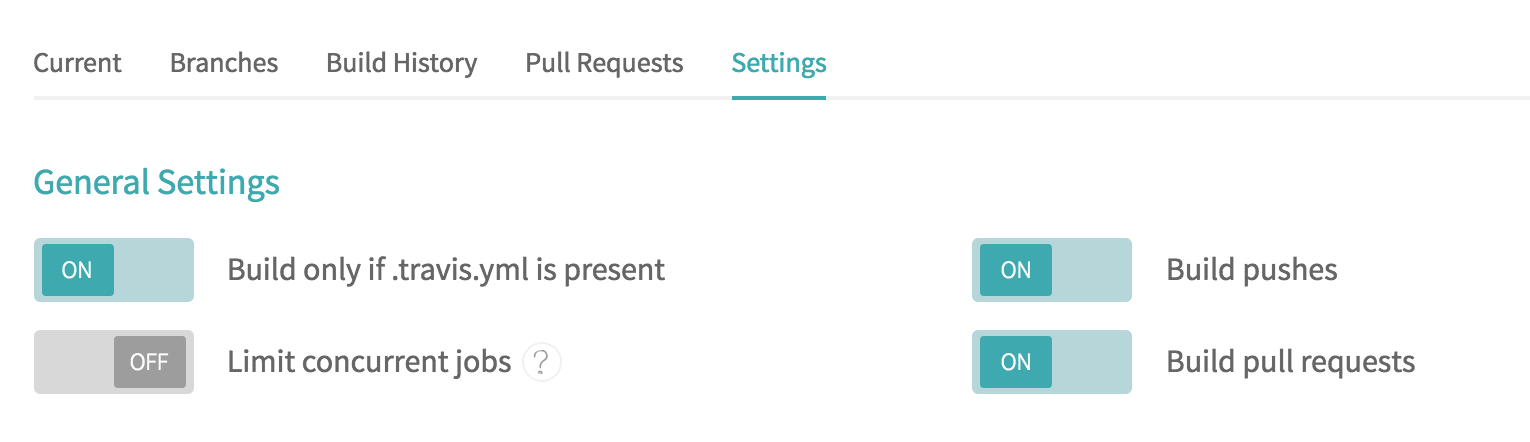
这里指明,只构建.travis.yml文件中配置的分支。

安装travis

1
2
3
4
//安装
gem install travis
//登录,先在travis网站直接使用github账号注册即可
travis login

配置 .travis.yml

1
2
3
4
5
6
7
8
9
10
11
12
13
14
15
16
17
18
19
20
language: node_js
node_js:
- 6.9.1 #node_js版本
branches:
only:
- master #只构建master分支
before_install:
before_script:

- git config --global user.name "coolcao"
- git config --global user.email "me@coolcao.com"
- npm install -g hexo-cli
install:
- npm install
script:
- hexo clean
- hexo generate
after_success:
- hexo deploy

加密私钥

我们使用travis将私钥文件加密,然后在构建的时候,travis会自动解密,然后使用这个私钥去clone代码,推送的使用也是使用这个私钥。

1
travis encrypt-file ~/.ssh/id_rsa_travis --add

这个命令会将私钥文件加密成id_rsa_travis.enc,而且在.travis.yml中会添加类似如下配置:

1
2
- openssl aes-256-cbc -K $encrypted_3649a89f32c4_key -iv $encrypted_3649a89f32c4_iv
-in .travis/id_rsa_travis.enc -out ~/.ssh/id_rsa_travis -d

key和iv会不同。
在ccsite项目中新建一个目录:.travis/,然后将id_rsa_travis.enc移动到.travis目录。

1
2
mkdir .travis
mv id_rsa_travis.enc .travis

ssh配置

在.travis目录下,新建ssh_config文件:

1
2
3
4
5
Host github.com
User coolcao
StrictHostKeyChecking no
IdentityFile ~/.ssh/id_rsa_travis
IdentitiesOnly yes

这里只需修改两个地方:user改为自己github名,IdentityFile改为自己生成的私钥文件。
然后,在.travis文件中,配置ssh相关:

1
2
3
4
5
6
7
8
- chmod 600 ~/.ssh/id_rsa_travis        #修改文件权限
- eval $(ssh-agent) #解析ssh
- ssh-add ~/.ssh/id_rsa_travis #添加私钥
- cp .travis/ssh_config ~/.ssh/config #复制ssh_config
- echo -e "Host git.coding.net\n\tStrictHostKeyChecking no\n" >> ~/.ssh/config #将host填入config
- echo -e "Host github.com\n\tStrictHostKeyChecking no\n" >> ~/.ssh/config
- git config --global user.name "coolcao" #配置用户名
- git config --global user.email "me@coolcao.com" #配置邮箱

完善.travis配置

最后检查一下,.travis文件是否是下面样式:

1
2
3
4
5
6
7
8
9
10
11
12
13
14
15
16
17
18
19
20
21
22
23
24
25
26
27
28
language: node_js
node_js:
- 6.9.1
branches:
only:
- master
before_install:
before_script:
- openssl aes-256-cbc -K $encrypted_3649a89f32c4_key -iv $encrypted_3649a89f32c4_iv
-in .travis/id_rsa_travis.enc -out ~/.ssh/id_rsa_travis -d

- chmod 600 ~/.ssh/id_rsa_travis
- eval $(ssh-agent)
- ssh-add ~/.ssh/id_rsa_travis
- cp .travis/ssh_config ~/.ssh/config
- echo -e "Host git.coding.net\n\tStrictHostKeyChecking no\n" >> ~/.ssh/config
- echo -e "Host github.com\n\tStrictHostKeyChecking no\n" >> ~/.ssh/config
- git config --global user.name "coolcao"
- git config --global user.email "me@coolcao.com"

- npm install -g hexo-cli
install:
- npm install
script:
- hexo clean
- hexo generate
after_success:
- hexo deploy

如无意外,将.travis.yml文件,.travis/ 目录下所有内容添加到git并推送到github,如无意外,则会在travis自动构建并发布你的hexo博客了。